
How we built the Traffic Policy module and its actions

There’s a million different ways to use ngrok.
That’s not some sappy platitude we tell ourselves. It’s something we’re proud of… but it’s also a real challenge we navigate as we build new features to help more people get their apps and APIs online without needing overly complex deployments or years of networking experience.
We also want to make all those different ways really easy to get started with and scale up. As Alan, our CEO, likes to say: We sweat the small stuff.
Last year, we realized the best way we could enable you, the developers and engineers behind all these potential use cases, was to help you to manipulate the traffic moving to and from your services conditionally and based on its qualities.
Today, we have Traffic Policy, which makes traffic actionable by letting you read, analyze, and process every request/response in exhaustive detail using the Common Expression Language (CEL). While there’s still a million different ways to use ngrok, there’s now one true way to shape and take action on your traffic.
Even better: The final one.
Pretty bold claim, I know, but stay with me.
Looking back to 1BTP (before Traffic Policy)
Let’s wind back the clocks to the days of yore: I’m talking about the year 2023. We were so young… so innocent. I remember I thought I was going to grow up to be an ice cream truck driver.
ngrok has always allowed you to create endpoints with multiple form factors—that’s part of our commitment to helping folks develop and deploy services faster, using the building blocks they’re most comfortable with. You can create one endpoint with the CLI agent, another using an SDK, and plenty more with the Kubernetes Operator.
Where that previously got quite complicated was how you configured various middleware like IP restrictions or authentication—we call those functions modules—depending on which form factor you chose. Adding modules to the agent required using CLI flags or a configuration file, whereas creating Edges directly meant using the ngrok dashboard or sending requests directly to the ngrok API.
The form factors didn’t even have consistent naming! If you wanted to configure IP restrictions with an agent configuration file, you used allow_cidrs, but when you used the CLI, you needed to switch to --cidr-allow.
Utter mayhem.
For users, all these options created a complex decision tree of form factors, configuration methodologies, and gotchas they would only figure out with some painful trial and error.
But that wasn’t all—users also didn’t love some fundamentals of how modules worked:
- They could only turn modules on and off. No nuance allowed.
- They couldn’t configure module behavior based on paths, headers, geographical origin, and so on.
- If they wanted to enable any of that nuance, they would have to add business logic and complexity to their upstream services, which isn’t always feasible or advisable.
- To adopt a new module in an existing ngrok deployment, whether a CLI agent or embedded in-app with an SDK, they had to update dependencies, which is both costly and risky.
We didn’t love the existing module landscape, either:
- We couldn’t develop new modules quickly due to their entanglement with the internal mechanisms of the ngrok platform.
- When we did get ambitious enough to deploy a new module, we had to implement it everywhere: agents, SDKs, Kubernetes Operator, API, API client libraries, and so on.
- The exponential complexity of helping users properly configure modules took a toll on our customer success and product teams.
So we started paving a new path.
The path to Traffic Policy
We started with a single goal: To define sets of rules that will conditionally act upon the traffic coming to and from endpoints.
This goal requires two fundamentals:
- Programmable expressions, written in the Common Expression Language (CEL), which allow you to filter and take action on specific types of traffic based on whether or not they evaluate to
trueorfalse. - At least three phases in the lifecycle of a request where you can use expressions to enable and configure various actions. For now, those phases are
on_tcp_connect, which takes effect when a connection is established to your endpoints,on_http_request(for HTTP protocols) which applies to HTTP requests destined for your upstream service, andon_http_response, which apply to HTTP responses headed back to toward the user or client.
Let’s explore how we designed solutions to those fundamentals to work more smoothly within the ngrok platform, but also provide a better and more comprehensive experience for you.
Before and after: solving for expressions
Before Traffic Policy, we had other modules that you could selectively enable on your endpoints. For example, you could create a tunnel in your v2 agent configuration file to add the IP Restrictions module, allowing or denying specific IP ranges.
In practice, the using the module might have looked something like this:
...
tunnels:
  example:
    proto: http
    addr: 80
    ip_restriction:
      allow_cidrs: [110.0.0.0/8, 220.12.0.0/16]
      deny_cidrs: [110.2.3.4/32]
The module, configured as so, works fantastically for explicitly blocking specific IPs and only allowing a trusted IP range, but comes with those limitations hinted at earlier: The IP restriction applies across the entire endpoint, without any of the conditional magic our users kept asking for.
We designed Traffic Policy with an entirely new configuration method for the v3 agent configuration:
traffic_policy:
  on_tcp_connect:
    - name: rule 1
      expressions:
        - x == y
        - x != z
      actions:
        - type: foo-action
          config:
            k1: v1
            k2: v2
  on_http_request:
    - name: rule 2
      expressions:
        - x == y
        - x != z
      actions:
        - type: bar-action
          config:
            k1: v1
            k2: v2
  on_http_response:
    - name: rule 3
      expressions:
        - x == y
        - x != z
      actions:
        - type: baz-action
          config:
            k1: v1
Enter the expressions key-value dictionary (or a list of expressions). If property x of the connection matches value y, but is not equal to z, then Traffic Policy triggers every subsequent action.
To implement the identical IP restriction functionality with Traffic Policy, you attach the restrict-ips action to the on_http_request phase:
...
endpoints:
  - name: example
    upstream:
      url: 8080
    traffic_policy:
      on_http_request:
        - name: "Restrict IPs"
          actions:
            - type: "restrict-ips"
              config:
      	        enforce: true
      	        allow:
                  - "110.0.0.0/8"
                  - "220.12.0.0/16"
                deny:
                  - "110.2.3.4/32"
You might be wondering to yourself, “This is the same functionality I just saw a minute ago with modules. Why are they doing it again? What about that whole conditional thing Rachel talked about earlier?”
With Traffic Policy, you get the power of the expression. This example is missing an expressions that would allow you to decide in which circumstances to restrict certain IPs. One simple example is adding additional protection to the administrative portal (at the /admin route) of a content management system (CMS).
In the example below, expressions enable that evaluation. By applying the restrict IPs action only to requests including /admin route, you fortify administrator views of your app against attack while leaving the rest available for clients or users everywhere. A little nuance goes a long way.
...
endpoints:
  - name: example
    upstream:
      url: 8080
    traffic_policy:
      on_http_request:
        - name: "Restrict IPs to admin portal"
          expressions:
            - "req.url.contains('/admin')"
          actions:
            - type: "restrict-ips"
              config:
      	        enforce: true
      	        allow:
                  - "110.0.0.0/8"
                  - "220.12.0.0/16"
                deny:
                  - "110.2.3.4/32"
At this point, conditional expressions: ✅
Designing Traffic Policy for inbound and outbound
Next, we needed a way to make Traffic Policy actions work on both incoming requests and outgoing responses from the services running behind your ngrok endpoints and agents. Enter the handler chain.
A handler chain is essentially a linked list of functions that perform the necessary duties of a middleware. When one function executes, it either rejects a request or continues down the chain to the next handler function.
For example, the handler chain for an endpoint with the IP restriction, OAuth, and compression modules enabled, looks like so:
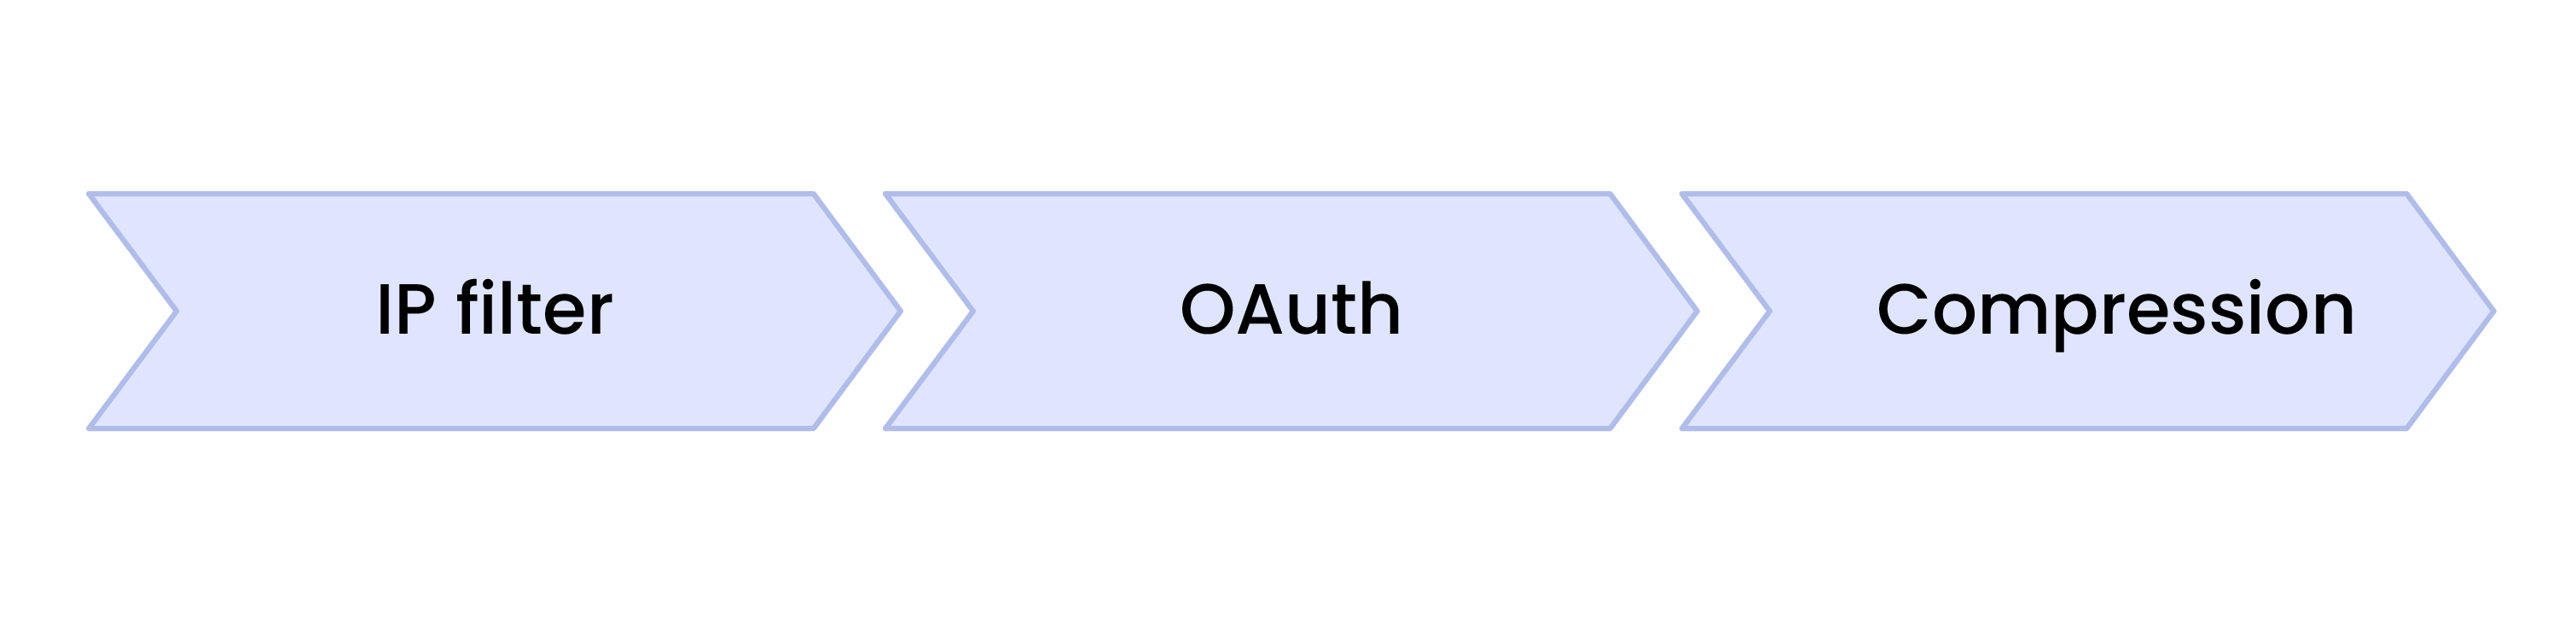
In reality, there’s a bit more to it. Each handler chain ends with a backend, which ultimately decides unto which agent session incoming traffic is forwarded.
I’m going to let you in on a little secret: There are also some internal handlers that run prior to the module handlers in order to do things like set up timeouts or wire up metrics. The very front of the handler chain is considered colloquially to be the frontend.

The insertion of handlers wasn’t the problem—the lack of flexibility was. Without a way to embed on_http_request rules before the backend, and capture responses on their way out of ngrok with on_http_response rules, Traffic Policy was a no-go.
Instead of abandoning handler chains in favor of different functionality, we dove in deeper: handler chains within handler chains. Each phase of the Traffic Policy composes its own series of functions to shape an endpoint’s traffic; the on_http_request chain executes before the backend, and the on_http_response chain is scheduled as a hook to execute after the backend.

By breaking up Traffic Policy into two handler chains, we could conditionally apply policy to all phases of your traffic. ✅
Gotcha: Scoping our CEL environments
The path toward enabling expressions on phases wasn’t always smooth sailing.
We build one CEL environment per phase (remember, on_tcp_connect, on_http_request, on_http_response), starting with on_tcp_connect:
onTCPConnectEnv, _ := cel.NewEnv(
  cel.Macros(inCIDRRange),
  cel.Variable("conn.client_ip", cel.StringType),
  cel.Variable("conn.client_port", cel.IntType),
  ...
  cel.Variable("endpoint.variable", cel.StringType),
  cel.Variable("time.now", cel.StringType),
)
Then the variables and macro functions of previously run phases are available the next:
onHTTPRequestEnv, _ := onTCPEnv.Extend(
  cel.Macros(getReqCookie, getReqHeader, getQueryParam),
  cel.Variable("req.content_encoding", cel.StringType),
  cel.Variable("req.content_length", cel.IntType),
  ...
  cel.Variable("req.user_agent", cel.StringType),
  cel.Variable("req.version", cel.StringType),
)
onHTTPResponseEnv, _ := onHTTPRequestEnv.Extend(
cel.Macros(getResCookie, getResHeader),
cel.Variable("res.content_encoding", cel.StringType),
cel.Variable("res.content_length", cel.IntType),
...
cel.Variable("res.status_code", cel.IntType),
cel.Variable("res.trailers", cel.MapType(cel.StringType, cel.StringType),
)
As we “teach” the CEL environments which variables are in scope—and we offer more than 100 of them—you can start to see a problem: that’s a lot of evaluation for every expression and interpolation for every request or response that passes through the handler chain. Since CEL doesn’t let you lazily evaluate in-scope variables, we were looking at way too much compute and data handling to work at the scale of data we deal with every day.
We needed a way to scope only the variables required to evaluate a given CEL expression at the moment the request/response is compiled into its handler chain.
Our resolution was to develop a hook that, when the Traffic Policy module compiles your rules (and expressions) into a handler chain, it also dramatically scopes down the variable data made available to the CEL environment.
Let's say we’re dealing with an on_http_request expression:
ast, _ := onHTTPRequestEnv.Compile(expression)
program, _ := onHTTPRequestEnv.Program(ast, cel.CustomDecorator(accessedVarTracker))
We compile the existing onHTTPRequestEnv CEL environment into an AST, then apply a custom decorator accessedVarTracker, which contains only the variables that showed up in the expression.
Then, at runtime:
celData := conn.PopulateData(accessedVarTracker.Vars())
expressionResult := program.Eval(celData)
Using accessedVarTracker, we explicitly only fetch the values of variables used in the expression in the on_http_request phase. The call to .Eval() is, finally, the actual expression evaluation that determines if the expression evaluates to true and we should add the associated action to the handler chain.
With the proper scope, Traffic Policy could quickly instantiate a CEL environment that has access to only the variables in use. We save tons of compute, and you can still route and shape traffic with the latency you expect from ngrok. ✅
Gotcha: SDKs, deprecation, and a better developer experience
As mentioned earlier, one of the core problems our users had with modules was that every change—whether a new module, a minor feature update, or major breaking change—required users to update their SDKs and apps.
We also didn’t love that before creating all that work for our users, we first needed to update ngrok in so many different places.
When building Traffic Policy over the last year, we wanted to not just minimize that problem, but eliminate it completely.
And conveniently, my friend and colleague Ryan is wrapping up an entirely separate blog about that change and what it means to you, working on Traffic Policy downstream. Stay tuned for that!
In short, we’ve chosen strings over structure—while we do need to do more work on our backend to manage how we deprecate old functionality smoothly, it’s worth a far better developer experience downstream for you, whether you’re using an SDK, Kubernetes Operator, and beyond. ✅
We’ve now entered 0TP… what’s next?
With these technical “gotchas” solved earlier this year, we launched Traffic Policy into general availability. It’s been a pretty wild ride since then, with users writing new rules and getting creative with expressions all the time.
We started by migrating existing module functionality over to Traffic Policy actions and our HTTP/TLS/TCP tunnel configurations, beginning with:
- Add Headers (HTTP): Insert headers into an HTTP request before it’s sent upstream—or into a response headed back to the client.
- Remove Headers (HTTP): Similar, but to strip headers, or replace them when paired with Add Headers.
- Compress Response (HTTP): Improve the performance of your services by having ngrok compress response bodies before routing to the client.
- Deny (HTTP/TLS/TCP): Reject unwanted requests before they reach your upstream service.
- Restrict IPs (HTTP/TLS/TCP): Allow or deny traffic based on the source IP.
We also leveraged all this wonderful string, CEL, and handler chain magic to add entirely new features never before seen on your ngrok endpoints:
- JWT Validation (HTTP): Validate JSON Web Tokens on your endpoints ngrok routes requests to your upstream service.
- Rate Limit (HTTP): Restrict the throughput of traffic to your upstream service.
- URL Rewrite (HTTP): Modify the incoming request URL without changing the client experience.
- Redirect (HTTP): Redirect requests to new URLs by modifying the
Locationheader. - Log (HTTP/TLS/TCP): Send details about requests and responses to your observability platform via ngrok’s eventing system.
While we already see Traffic Policy as the only one way to manage your inbound/outbound traffic, we also recognize there is a long way to go until we can deprecate all our old modules and get everyone onboard with rules, expressions, and actions.
We also don’t want to migrate all the modules over and call it a day, which means we’re looking into other new Traffic Policy functionality you might find useful, like:
- Triggering actions that take place only if another action fails.
- Forwarding requests to specific services, private networks, or even third-party services or APIs.
- Configuring global authentication and security policy at the ngrok platform, allowing app or API developers to self-serve an API gateway and then configure more nuanced Traffic Policy, like URL rewrites, just for their service.
We’re willing to make all these sweeping changes to ngrok’s internal infrastructure because we sweat the small stuff. Especially when it comes to making it faster and safer to get your apps and APIs online without spending time dealing with complex networking primitives. No matter where we head next, it’s an exciting time for Traffic Policy—we can’t wait to have everyone join us in 0TP: ngrok’s new era of Traffic Policy.
Time to discover the 1,000,001th way to use ngrok
You can try Traffic Policy right now with an ngrok account! Your first 2,000 requests with actions enabled are free, and with a pay-as-you-go plan, you can unlock 100k+ requests/month for your production needs.
We have tons of documentation and blogs that detail the endless possibilities of Traffic Policy, from initial setup to nuanced rules like blocking AI bots that hoover up your data for training:
- Introducing ngrok's Traffic Policy module
- Docs: Traffic Policy overview
- Developer's guide: Manage traffic with CEL expressions and connection variables
- Redirect vs URL rewrite in an API gateway
- Deploy advanced HTTP traffic shaping with request variables and CEL
- Battle against search and AI bots on your ngrok endpoints
If you have questions about how Traffic Policy works, or want to see more examples of chaining together actions to enable your APIs, apps, services, devices, and beyond, try the following:
- Ask your question or suggest a new feature on our new community GitHub repo.
- Register for our next Office Hours session and add your question to the form, giving our DevEd and product teams plenty of time to prepare a live demo with your solution!

